
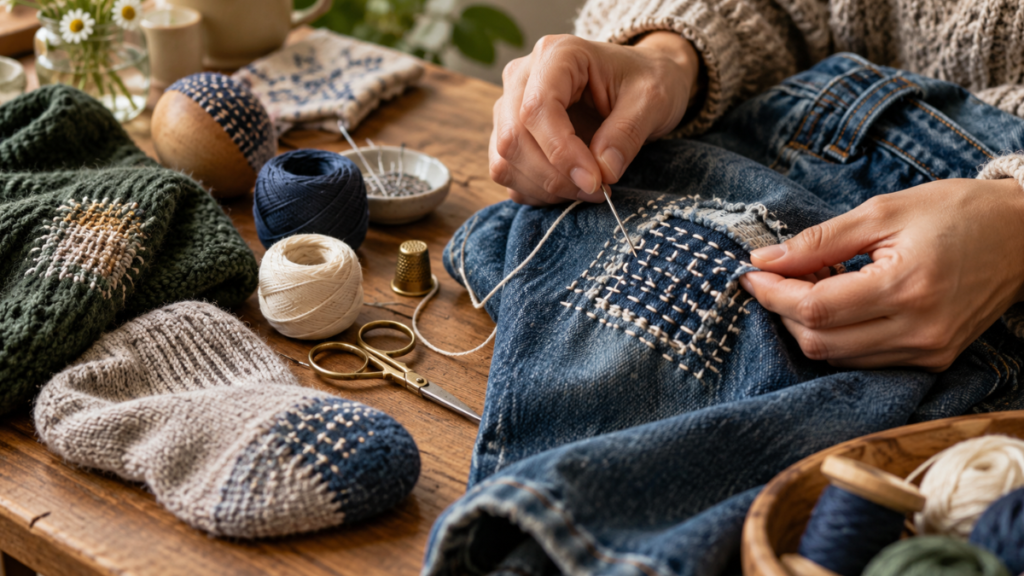
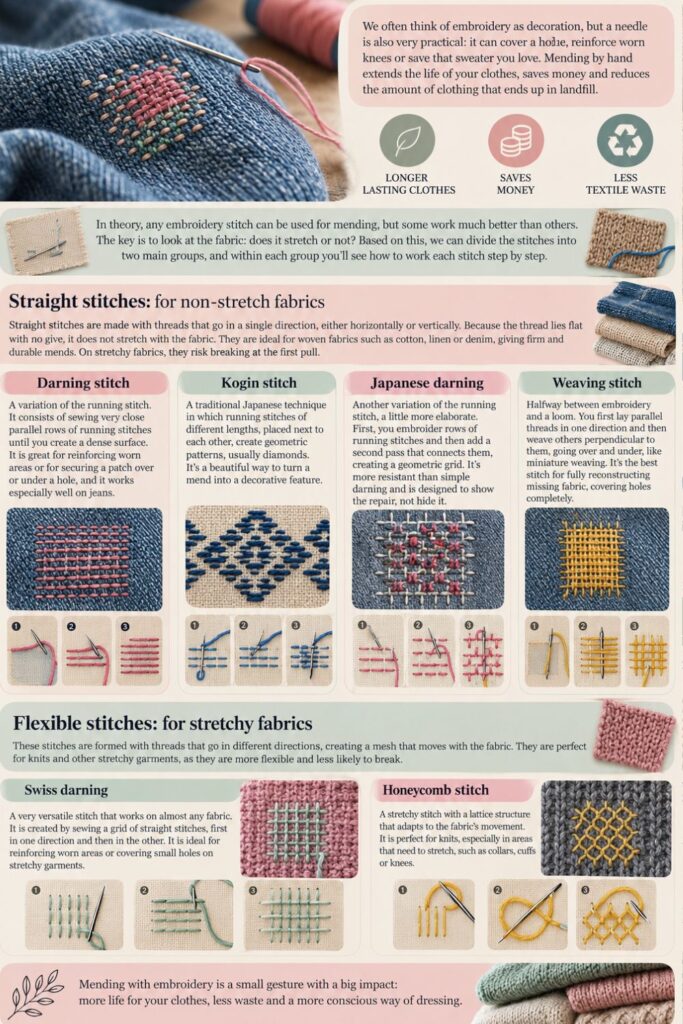
Most of us think of embroidery as purely decorative, but your needle has a seriously practical side too, to mend clothes. Patching a hole, reinforcing worn-out knees, saving that favorite sweater before it falls apart.
Mending by hand makes your clothes last longer, saves you money, and keeps perfectly good garments out of the landfill.
Technically any embroidery stitch can work for mending, but some are way better suited than others. The trick is to look at the fabric: does it stretch or not? That one question narrows things down fast. I’ve broken everything into two main groups below, with step-by-step instructions for each stitch.
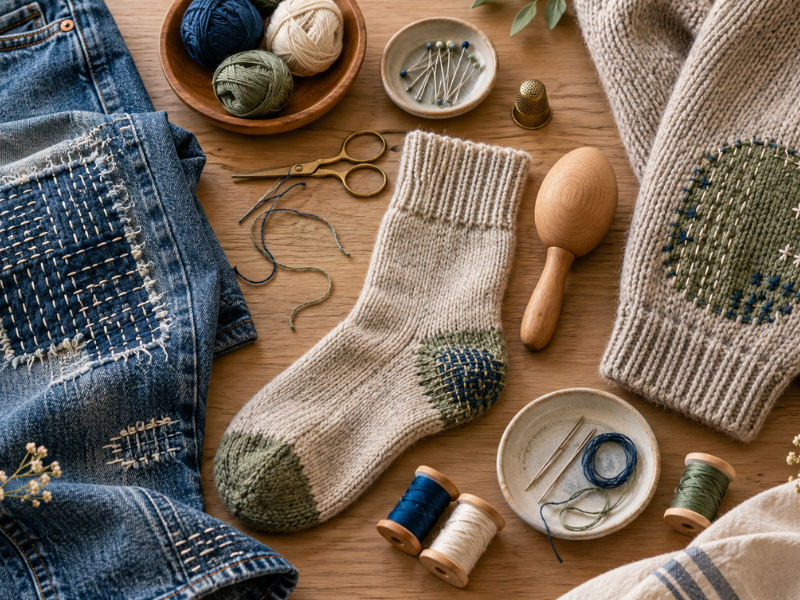
Illustration of common mending supplies
This post contains affiliate links. See disclosure for details.
Straight Stitches: For Fabrics That Don’t Stretch
Straight stitches run in one direction — horizontal or vertical. The thread sits flat with no slack, so it can’t move with the fabric when it stretches.
That makes them perfect for woven fabrics like cotton, linen, and denim. The repairs are rock-solid and long-lasting. On stretchy fabric, though, they’ll snap the first time the material pulls.
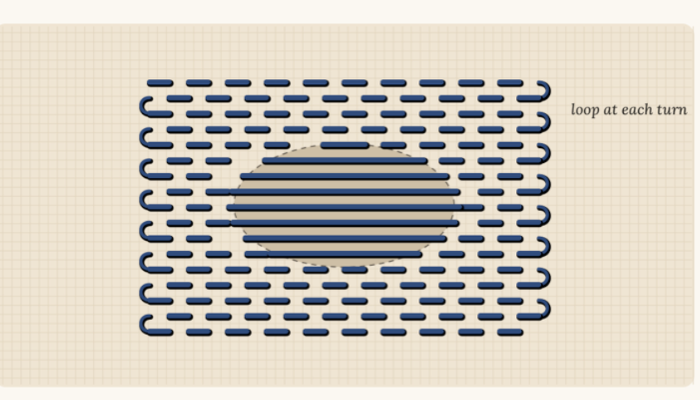
Darning stitch diagram for mending a hole in woven fabric
Darning Stitch
This is basically rows and rows of running stitch packed tightly together. Running stitch is the simplest stitch in embroidery, and you just repeat it until you’ve built up a dense, solid surface.
It’s great for reinforcing worn spots or securing a patch over (or under) a hole, and it works beautifully on denim. You can use it on knits too, but only in areas that don’t need to stretch (never on necklines or cuffs).
How to do it: use tailor’s chalk to mark a rectangle around the damaged area, extending at least half an inch beyond it on every side. Start in one corner and work across in a straight line, picking up small bits of fabric with your needle so the visible stitches and the gaps between them are roughly the same length.
When you reach the edge, turn around and come back in the opposite direction, keeping the new row as close as possible to the previous one. At each turn, leave a tiny loose loop instead of pulling the thread tight. This keeps the mend from puckering the fabric. For extra strength, offset the stitches in each row from the one before, like bricks in a wall.
You can find more details in this post.
If you like this stitch, you might want to know that sashiko (the Japanese embroidery technique with geometric white patterns on indigo fabric) is also based on the running stitch. It was originally created to reinforce and mend work clothes, so in a way, it’s a form of decorative darning.
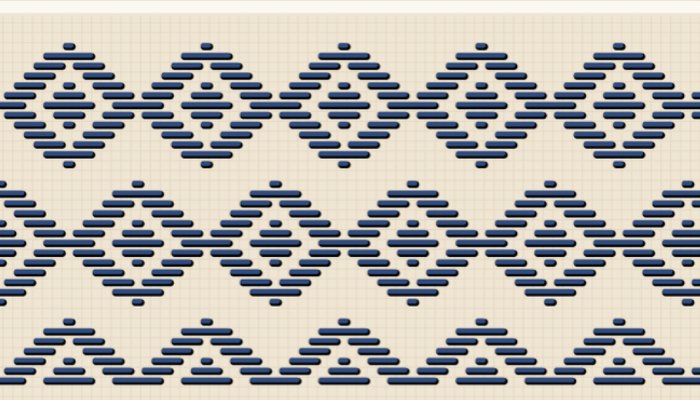
Kogin stitch diagram with diamond patterns
Kogin Stitch
A traditional Japanese technique where running stitches of different lengths are placed side by side to create geometric patterns, mostly diamonds. It’s a gorgeous way to turn a mend into a design feature. If you’re looking for patterns, Kogin Bank has a huge collection of free designs.
How to do it: kogin is a counted-thread technique, so it works best on evenly woven fabrics like linen or evenweave cloth. You stitch in horizontal rows following a chart, and each stitch passes over an odd number of fabric threads (one, three, five, and so on). By varying the stitch lengths from row to row, the patterns emerge. Don’t pull the thread tight, it should lie flat and loose on the surface so the design really pops.
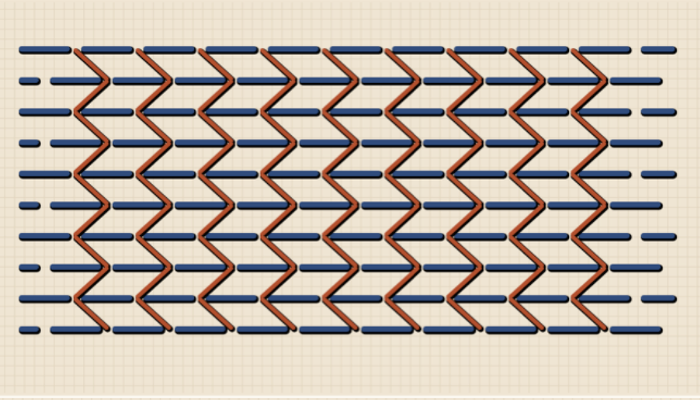
Japanese darning diagram with two thread passes
Japanese Darning
Another variation of the running stitch, just a bit more involved. You start by stitching rows of running stitches, then add a second pass that connects them and creates a geometric grid. The result is stronger than basic darning, and it’s designed to show off the repair rather than hide it.
How to do it: stitch horizontal rows of long running stitches with short gaps between them, offsetting each row so the stitches alternate.
Then work the second pass, connecting stitches from adjacent rows with short stitches to form the geometric pattern. Using a different color thread for the second pass makes the design stand out even more.
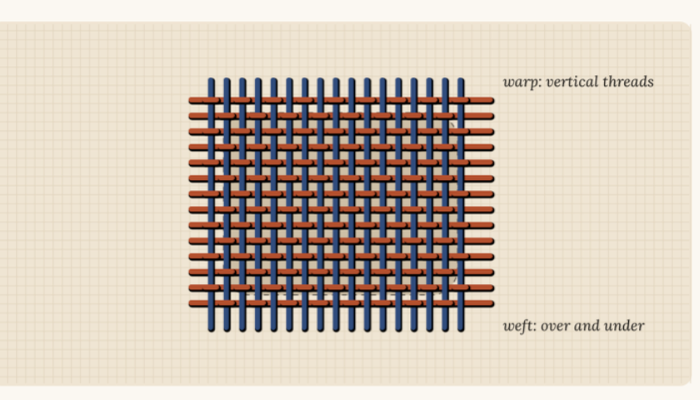
Needle weaving diagram for darning a hole with warp and weft
Needle Weaving
This one sits halfway between embroidery and actual weaving. You lay parallel threads in one direction first, then pass threads through them perpendicularly — over, under, over, under. Like you’re working a tiny loom.
This is the stitch that does the best job of actually recreating missing fabric, so it can fill a hole completely. Use matching thread for a nearly invisible repair, or go with contrasting colors for something more playful.
How to do it: trim any loose threads around the hole and draw a square or rectangle around it. Lay vertical threads across the opening, anchoring them in the solid fabric on either side and keeping them close together, this is your warp.
Then switch to a tapestry needle and weave horizontal threads through, alternating over and under the vertical ones. On the next row, reverse the pattern, where you went over, now go under.
Every few rows, use the tip of your needle to push the threads together so they pack tightly. If you want to get fancy, you can vary the weaving pattern to mimic a twill, basket weave, or satin weave instead of basic plain weave.
Looped Stitches: For Stretchy Fabrics
With looped stitches, the thread works in two directions at once, the horizontal strand is linked to the vertical one. That loop gives the mend some give, so it stretches along with the garment. These are the ones to reach for when you’re working with knitwear, t-shirts, socks, and anything with some stretch.
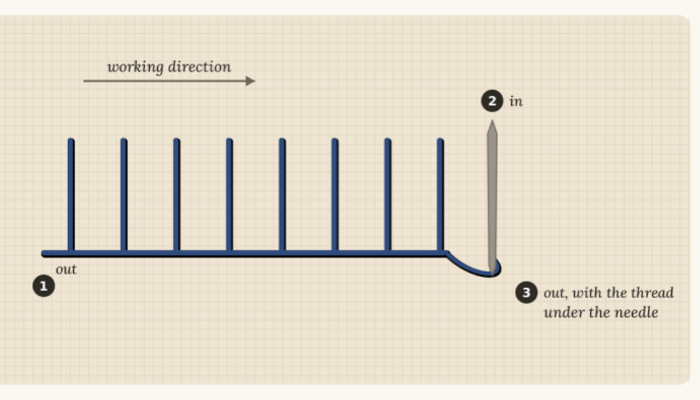
Blanket stitch diagram step by step
Blanket Stitch
A classic for finishing hems and edges, and also great for stitching down appliqués and patches. It creates a line with little L-shaped “legs”. You can get completely different looks by playing with the leg length and spacing.
How to do it: work from left to right. Bring your needle up on the lower line, insert it a little higher and to the right, then bring it back out directly below on the lower line — with the thread passing under the needle tip. When you pull through, the thread forms an L. Repeat, keeping the height and spacing consistent.
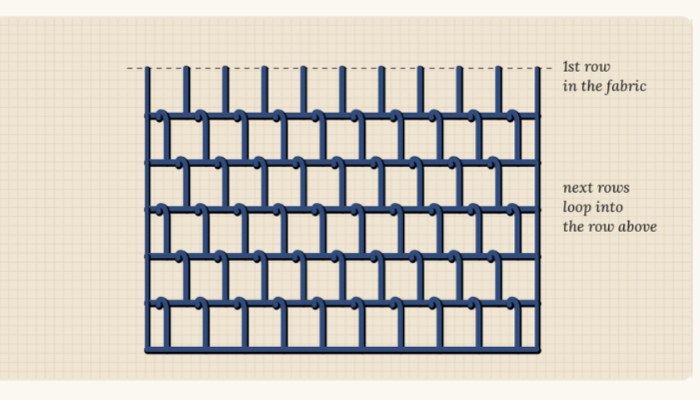
Blanket stitch filling diagram for reinforcing stretchy fabrics
Blanket Stitch Filling
Stitch rows of blanket stitch right next to each other, hooking each row into the one above, and you end up with a kind of net. It’s stable, stretchy, and has a really nice texture. It´s perfect for reinforcing worn areas or anchoring patches on stretchy fabric.
How to do it: stitch a first row of blanket stitch along the top edge of the area you want to cover. For the second row, instead of piercing the fabric, pass your needle through the loops of the row above (always keeping the thread under the needle tip), and anchor the ends of each row into the fabric.
Keep going until you’ve covered the whole surface. The shorter the stitches, the denser the net.
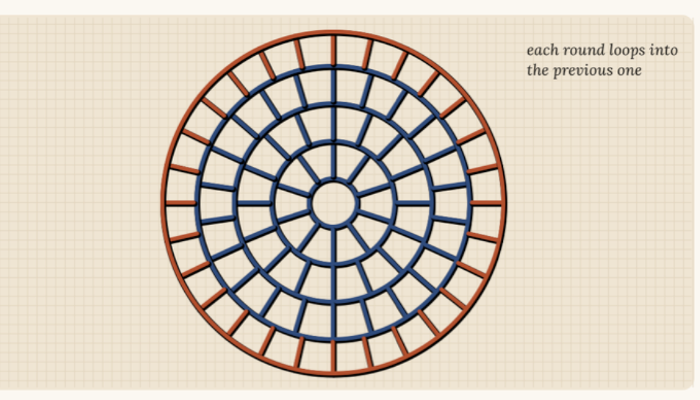
Circular blanket stitch filling diagram
Circular Blanket Stitch Filling
Same concept, but working in a spiral or concentric circles. The result is a circular net that’s really decorative and still has plenty of stretch.
How to do it: start with a small circle of stitches in the center and work a round of blanket stitch around it, with the legs pointing outward. On each new round, hook your stitches into the loops of the previous round and add an extra stitch here and there as the circle grows.
If you’re covering a hole, work from the solid edge inward so the net gradually closes in.
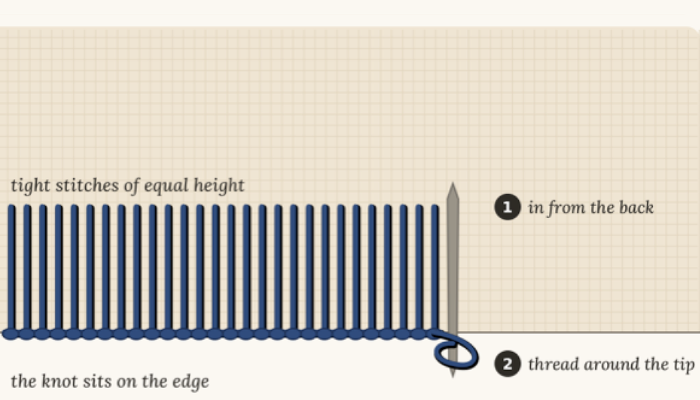
Buttonhole stitch diagram with knot on the edge
Buttonhole Stitch
This is the first stitch to reach for when a buttonhole starts fraying. It creates a tight, sturdy edge that holds up in areas that take a lot of wear. It also makes a clean border for patches.
How to do it: it’s similar to blanket stitch, but with the stitches packed tightly together and a small knot on the edge. Insert your needle from the back, wrap the thread around the tip before pulling it through, and pull upward so the knot sits right on the edge of the fabric.
Repeat with stitches close together and at the same height. At the ends of a buttonhole, it’s common to add a few straight crosswise stitches (called bar tacks), for extra reinforcement.
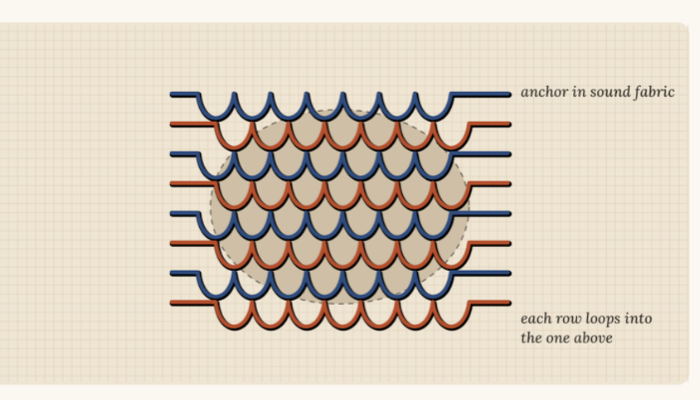
Scotch darning diagram for mending sweaters and socks
Scotch Darning
A go-to for knitwear. This one produces a sturdy mend that can completely cover a hole without losing any stretch, which makes it perfect for sock heels and sweater elbows, exactly the spots that wear out first.
How to do it: work in rows of loops that span the hole from side to side, anchoring into the solid fabric on either end. Each new row hooks into the loops of the row above, gradually building a mesh that mimics the structure of the knit fabric. Keep going row by row until the hole is closed, then anchor the last row into the solid edge.
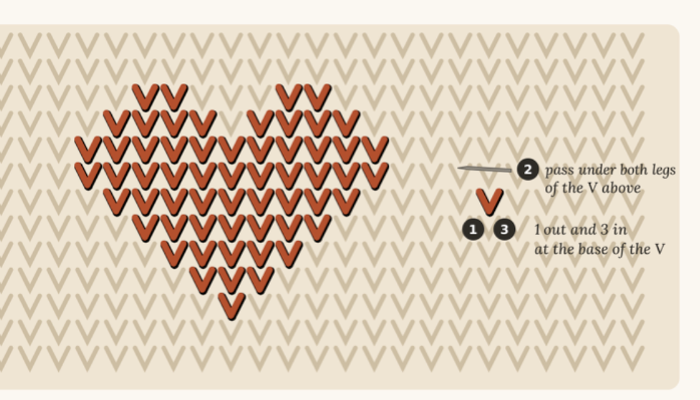
Duplicate stitch (Swiss darning) diagram over stockinette
Duplicate Stitch (Swiss Darning)
This stitch traces the V shapes of stockinette, following the path of the original knitting. With matching thread, the repair is practically invisible; with a bold color, it becomes a design detail.
How to do it: bring your needle up from the back at the base of a V. Pass it from right to left under the two legs of the V directly above, then insert it back into the base of the V you started from. That covers one complete stitch. Continue with the next stitch in the row.
If there’s a hole, first lay horizontal threads across the gap like a ladder, anchoring them in the solid knit on either side, then stitch the V’s over that ladder.
Which Stitch to Use for What
If you’re in a hurry, here’s a quick rundown.
| Stitch | Type | Best for |
|---|---|---|
| Darning stitch | Straight | Denim, cotton, reinforcing worn areas |
| Kogin stitch | Straight | Linen and evenly woven fabrics, decorative mending |
| Japanese darning | Straight | Visible, durable repairs on woven fabric |
| Needle weaving | Straight | Filling holes completely, including on sweaters |
| Blanket stitch | Looped | Hems, edges, appliqués and patches |
| Blanket stitch filling | Looped | Reinforcing worn areas on stretchy fabrics |
| Circular blanket stitch filling | Looped | Decorative, stretchy repairs |
| Buttonhole stitch | Looped | Fraying buttonholes and patch edges |
| Scotch darning | Looped | Sock heels and sweater elbows |
| Duplicate stitch | Looped | Invisible repairs on knits |
What You’ll Need
Here’s everything you’ll need:
- Needles: a large-eye embroidery needle for woven fabrics, and a tapestry needle (blunt tip) for knits and for needle weaving.
- Thread: embroidery floss, perle cotton, or sashiko thread for woven fabrics; wool or darning yarn for knits.
- Small scissors for trimming loose threads and finishing off.
- Chalk or tailor’s chalk for marking the area you’ll be working on.
- Embroidery hoop for woven fabrics, or a darning egg or mushroom for socks and sweaters.
- Fabric scraps if you’re planning to patch behind or over the hole.
Tips Before You Start
Wash the garment first. That way you’re working with pre-shrunk, clean fabric, and you can see the full extent of the damage.
Match the thread weight to the fabric. For denim, perle cotton or sashiko thread works well; for knitwear, use a yarn with a similar weight to the garment.
Always work a larger area than the hole itself. The fabric around it is usually weakened too, so if you only anchor the mend right at the edges, it’ll tear again.
Use a support for knitwear. A darning egg, an old light bulb, or even an orange will keep the fabric taut and stop you from accidentally stitching through both layers.
For woven fabrics, use a hoop. It’ll help you keep even tension so the mend doesn’t pucker.
Don’t pull too tight. An overly taut mend will pucker the fabric and eventually pull at the surrounding material.
Frequently Asked Questions About Mending Clothes
What’s the easiest stitch for beginners?
The darning stitch. All you need to know is running stitch (the simplest stitch in embroidery) and repeat it in closely packed rows. An old pair of jeans is the perfect garment to practice on.
What’s the difference between darning and mending?
Darning means filling a hole or worn area with thread, rebuilding the fabric stitch by stitch. Mending is a broader term that also includes patching with fabric.
In practice, the two are often used interchangeably, and many repairs combine both — a patch on the back held in place with darning stitches on the front.
Which stitch should I use to fix a sweater?
To fill a hole, Scotch darning or needle weaving. For an invisible repair, duplicate stitch with matching yarn. Avoid basic darning stitch on necklines, cuffs, and hems — those areas need to stretch.
What about ripped jeans?
The darning stitch is your best bet, especially if you place a fabric patch on the wrong side. If you want the repair to show and become part of the design, try Japanese darning or sashiko-inspired patterns.
Can you make a mend invisible?
Almost invisible, yes. The key is using thread that matches the fabric in both color and weight. On knits, duplicate stitch blends in best; on woven fabrics, needle weaving with matching thread recreates the fabric so discreetly it’s hard to spot.
What is visible mending?
It’s the trend of showing off your repairs instead of hiding them — using contrasting thread colors, bold patches, or decorative stitches like kogin or Japanese darning. It turns every repair into a one-of-a-kind design detail, and it’s part of the push toward more sustainable fashion.
Do I need a darning egg?
They’re really helpful for socks and sleeves, but not strictly necessary. A burned-out light bulb, a tennis ball, an orange, or even the bottom of a glass all serve the same purpose — keeping the fabric taut and separating the two layers.
Can embroidered mends survive the washing machine?
Absolutely, as long as you secure the thread ends on the back and anchor the mend into solid fabric. To make them last even longer, wash the garment inside out on a gentle cycle and skip the dryer.
Learning to mend your own clothes is genuinely worth the effort. You save money, reduce your environmental footprint, and take a small step away from fast fashion (I wrote more about slow fashion in this post if you’re curious). Plus, there’s something really meditative about it. Start with a basic darning stitch on an old pair of jeans or some Scotch darning on a sock, and you’ll see how satisfying it is to give a garment a second life.
Have you ever mended something by hand? Which of these stitches are you most excited to try, or do you already have a favorite?
Drop me a comment below, I love hearing about your projects, and if you have questions about a specific repair, I’m happy to help.
And if this post was helpful, share it with that friend who always has a sweater with a hole in the elbow.

