
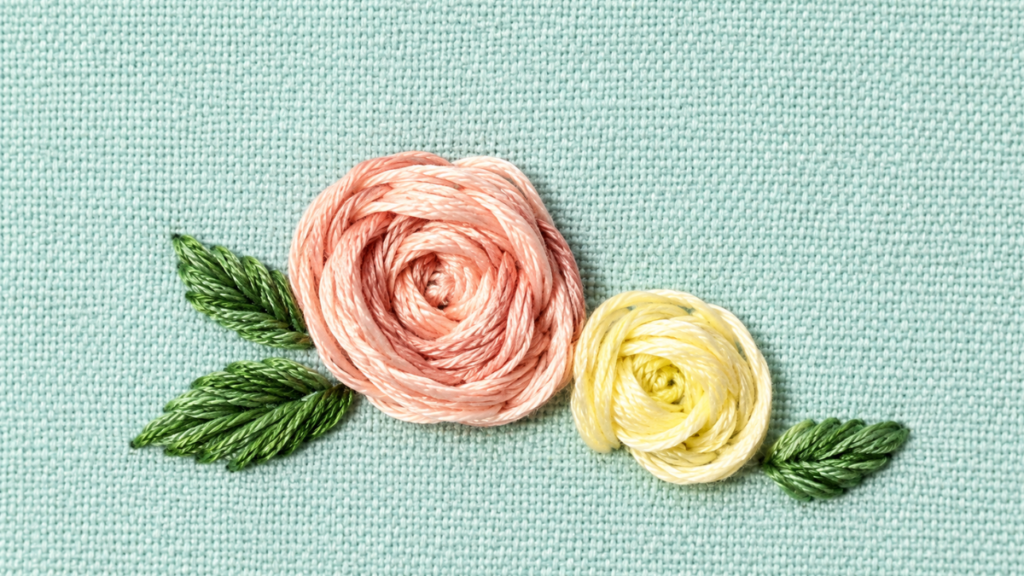
Learn how to embroider raised roses with just a needle and thread using a simple technique. Follow the woven wheel method step by step to create gorgeous floral designs without the stress.
If you’ve ever seen garments or hoops decorated with flowers that seem to pop right off the fabric and assumed it was a technique only advanced stitchers could pull off, you’re about to be pleasantly surprised.
Today I want to show you how to create raised roses with nothing more than a needle and embroidery floss.
I’ll take you through everything from setting up the base with three key lines to the trick for weaving the thread around without pulling too tight, so you get that fluffy, rounded volume that makes these roses so special.
This post contains affiliate links. See our disclosure for details.
Raised Embroidery
Some needlework takes months of practice or follows patterns so detailed they end up feeling like a chore when all you want is a relaxing afternoon project. Raised embroidery, though, especially this technique built on weaving thread over a spoke structure, gives you that instant payoff that hooks you from the very first try.
Here’s why it works so well:
You use all six strands of standard embroidery floss at once, which means the flower fills in fast and has real presence right away.
There’s zero fuss with fabric tension, because the needle doesn’t go through the back of the cloth during the weaving. No puckering, no weird bumps.
It’s surprisingly quick. You can finish a whole arrangement of flowers and leaves in a single afternoon.
It’s versatile enough to personalize anything, from the lapel of a denim jacket to a cushion cover or the front of a fabric notebook.
There’s also something really calming about the rhythm of it, passing the needle over and under the spokes, over and under. It puts you in a great headspace.
Getting Your Materials Ready
Before you thread your needle, it’s worth taking a couple of minutes to go over what you’ll need.
Fabric and Hoop
For the embroidery to look clean and stay put while you work, the right base matters. Natural fiber fabrics like linen, lightweight cotton canvas, or duck cloth are ideal. They have a firm weave that holds stitches well.
A wooden or bamboo embroidery hoop is your best friend here. It keeps the fabric drum-tight while you pass the needle through. I’d recommend a medium-sized hoop, about six or seven inches across, which fits comfortably in your hands and lets you work without straining your wrist.
Embroidery Floss and How It’s Built
For this type of raised flower, standard six-strand embroidery floss is the way to go. It typically comes in a skein made up of six individual strands twisted together.
Unlike more delicate stitches where you’d normally separate out two or three strands, here we use all six together without splitting them.
Keeping the full six strands gives the rose a beautiful density with far fewer passes of the needle, covering the base quickly and cleanly.
Woven Rose on Three Spokes
The trick to getting that rounded, puffy shape is all in the geometry of the base. A lot of traditional guides teach woven roses on five or seven spokes, but when you work with a simplified three-spoke structure, the whole thing becomes much faster and more approachable.
The design is built from three essential parts:
A circle drawn on the fabric with a pencil or erasable marker that sets the finished size of the flower.
Three lines traced from the outer edge to the center, spaced evenly like the hands of a clock.
The body of the rose, which is woven by passing the needle alternately over and under those three guide lines without piercing the fabric, building up soft layers from the center outward.
Step-by-step guide to creating the three-spoke base, weaving the flower in a spiral, and adding dimensional green leaves.
Total Time: 20 minutes
Draw the base pattern on the fabric
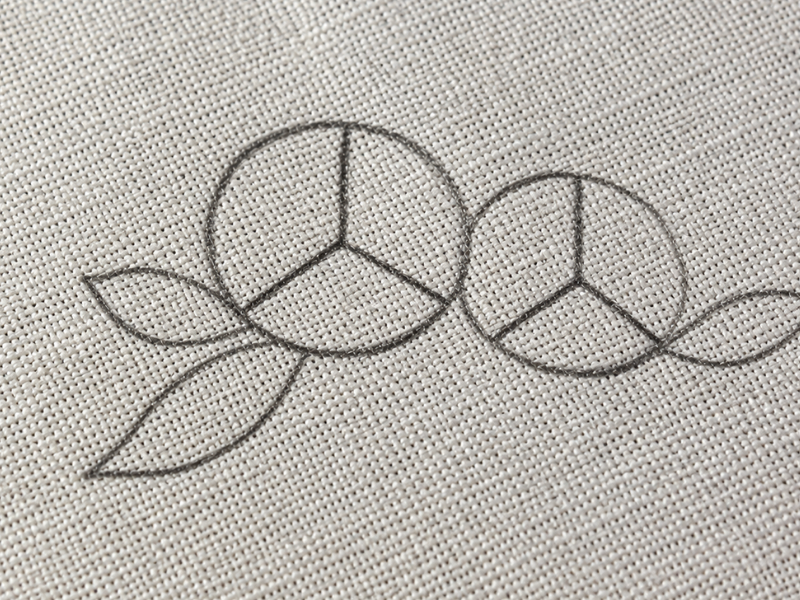
Draw a circle on the fabric with a pencil or erasable marker to set the size of the flower. Trace three straight lines from the outer edge that meet at the center, evenly spaced apart.
Create the three-spoke support structure
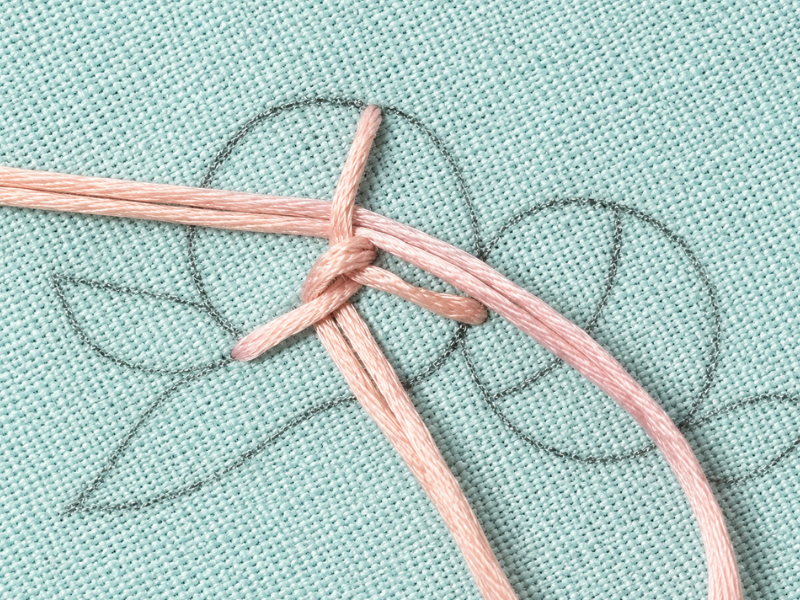
Thread the needle with all 6 strands of floss in the color of your rose. Bring the needle up from the back at the end of each of the three lines and push it down at the center to form a three-spoke star on the fabric.
Weave the raised body using the woven wheel technique
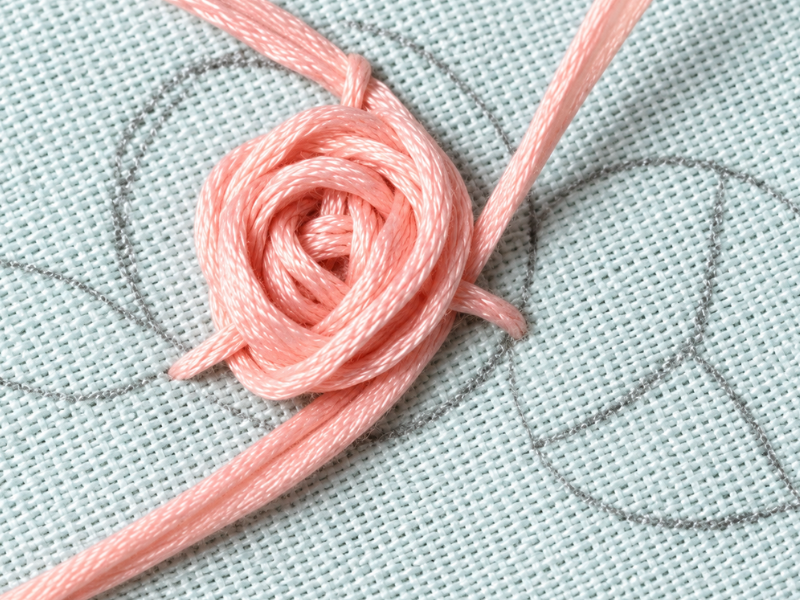
Bring the needle up near the center between two spokes. Weave in a spiral, passing the needle over and under the spokes alternately without piercing the fabric, keeping the tension loose to build up soft, cushioned layers.
Finish the main rose and add smaller flowers
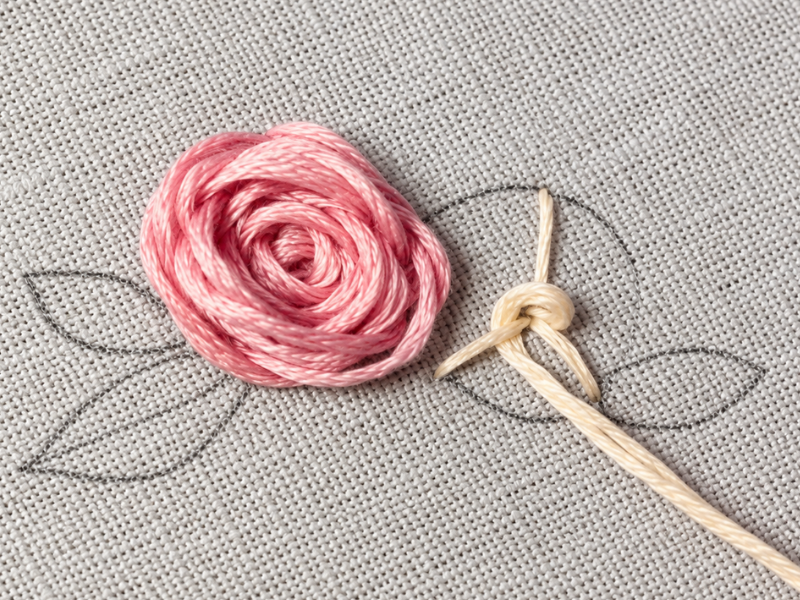
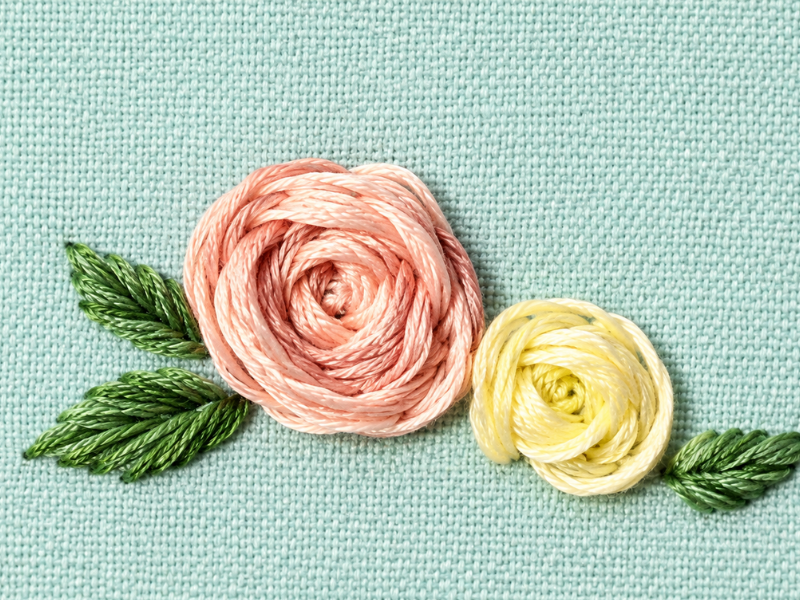
Once the three base spokes are fully covered, push the needle through to the back and tie off. Repeat the same three-spoke and spiral weaving technique with a different color floss to create smaller flowers around the main one.
Embroider the leaves
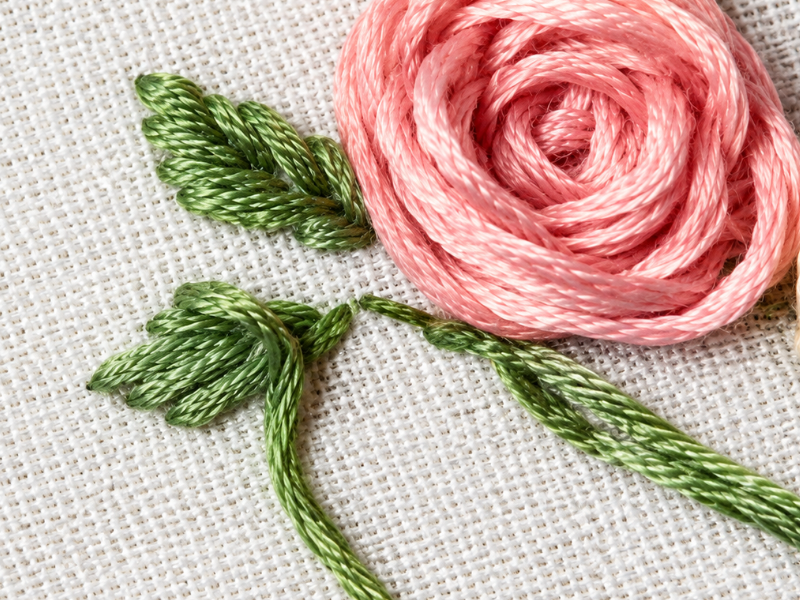
Thread the needle with all 6 strands of green floss. Draw simple leaf shapes and fill them with straight stitches angled toward the center vein. Clean any pencil marks off the fabric and trim the loose threads on the back.
Supply:
- 6-strand embroidery floss
- Scrap of linen, canvas, or cotton fabric
Tools:
- Embroidery needle
- Wooden embroidery hoop, 6 to 7 inches
- Fabric scissors
- Soft pencil or water-erasable fabric marker
If you prefer, you can watch the video version.
Managing Thread Tension for Volume
The single thing that separates a flat, squished result from a beautifully puffy rose is how you guide the thread with your hands. When we stitch traditionally on fabric, we tend to pull the needle back with some firmness to keep things flat. With this technique, that habit needs to go.
Think of it like weaving a tiny wicker basket. If you pull the thread too hard as it passes under the three support spokes, you’ll strangle the center of the star.
The spokes will bunch together into one tight mass, and you’ll lose the room you need to keep passing the needle on the next rounds.
The trick that works best for me is using the thumb of my free hand to gently comb and settle the thread as I go. Let the thread land softly on the surface and nudge it lightly toward the center with your fingertip.
By keeping things loose, each round rests on top of the one before it, building up layered, overlapping ridges that give the rose that soft, three-dimensional look.
Color Variations and Composition Ideas for Your Projects
One of the most addictive parts of this technique is the freedom to play with your color palette. Once you’ve got the basics down, you can adapt the design to whatever piece you want to personalize.
Playing with Different Sizes and Shades
To create a balanced arrangement on a decorative hoop or a shirt pocket, aim for contrast between the main flower and the details around it.
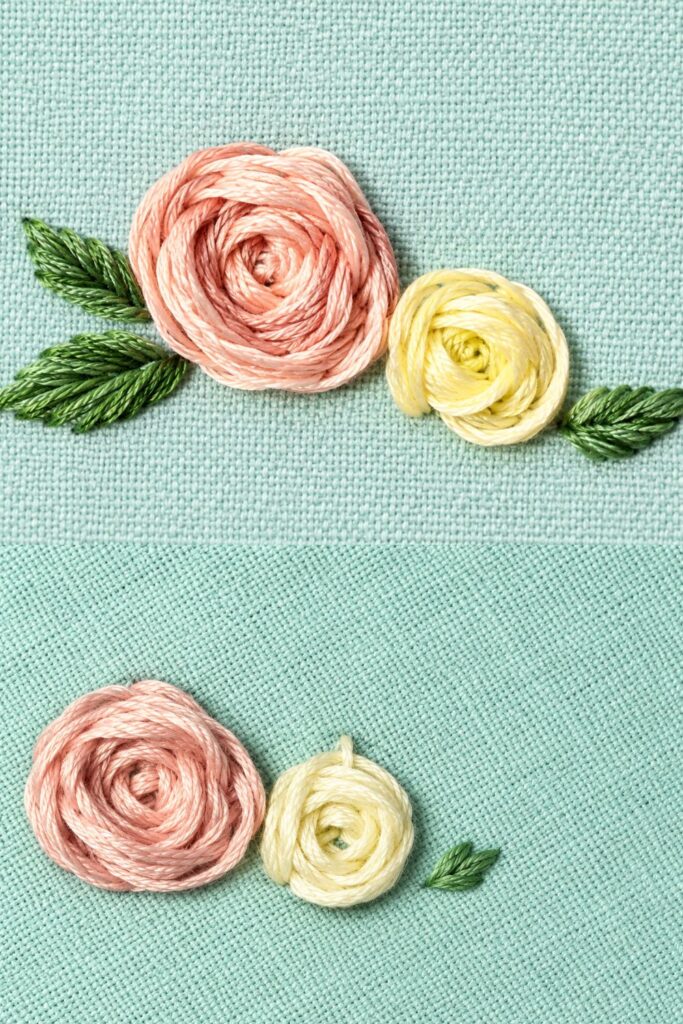
A medium-sized central rose in pink or coral, surrounded by two or three smaller buds in white, creates a really sweet visual balance.
You can also try two-tone roses within the same flower. Start by weaving the center with a few rounds of yellow or deep red, then switch your needle to finish the outer rounds in blush pink. You’ll get a blooming effect with a deep heart that looks really striking.
Adding Simple Green Foliage
Leaves are the perfect frame for making embroidered roses stand out against the fabric. You don’t need complicated lace-style leaf stitches. Simple straight stitches angled diagonally toward a center vein are all it takes to fill in clean, neat leaves.
Using all six strands of green floss, those simple stitches pick up a volume very similar to the flowers, so the whole piece shares the same cushioned, uniform texture.
Common Mistakes When Embroidering Raised Roses
Even when the technique seems crystal clear, it’s completely normal for little questions to pop up along the way. Let’s go over the most common hiccups and how to fix them fast.
What to Do If the Needle Catches the Fabric While Weaving
If you notice the needle keeps piercing the base fabric or snagging on threads from a previous round as you pass under the spokes, try flipping it around. A dead-simple trick is to lead with the eye end of the needle instead of the point.
The blunt end glides smoothly between the floating threads without any risk of poking through the fabric or breaking strands you’ve already placed.
How to Fix Visible Pattern Lines
If you finish weaving the flower and notice pencil or marker lines peeking out at the edges, don’t panic. To prevent this from the start, make sure your last few spiral rounds extend slightly past the length of the three base spokes.
If you used water-erasable or heat-erasable markers, a damp brush or a quick shot of steam from your iron on the back of the work will make any trace of ink disappear completely.
Tips for Washing and Caring for Your Raised Embroidery
When you use this technique on everyday items like a jacket, a sweater, or a fabric bag, you want the raised texture to stay fluffy and clean for a long time.
I’d recommend hand-washing these pieces in a basin of lukewarm water with a gentle detergent for delicates. Avoid rubbing directly over the embroidered area so the threads don’t lose their natural shape.
For drying, don’t wring the piece out by twisting it. Lay it flat on a clean towel, press gently to remove the excess moisture, and let it air-dry horizontally.
If you need to iron the item, always do it on the wrong side and place a fluffy towel underneath the embroidery so you don’t flatten the volume of the roses.
Frequently Asked Questions About Embroidering Raised Roses
How much floss do I need for a medium-sized rose?
For a rose about one inch across using all six strands of embroidery floss, you’ll use roughly one standard length of about 24 to 30 inches. It’s a great project for using up those leftover bits of floss from other work.
Can I use other types of thread for this technique?
Definitely. Cotton embroidery floss gives you a smooth, polished result, but you can also try fine embroidery wool or perle cotton. Wool adds an even fluffier, cozier texture that’s perfect for decorating knitted items in fall and winter.
Do I always need an embroidery hoop?
You can technically stitch without one if the fabric is very stiff, like a heavy canvas. But a hoop makes the whole process so much easier. It keeps the tension right so the stitches don’t pucker the background while you weave the flower above it.
Can I embroider these roses on stretchy fabrics like t-shirts?
Yes, but I’d recommend placing a piece of iron-on fusible interfacing on the wrong side of the shirt behind the area where you’ll be stitching. This keeps the knit fabric from stretching unevenly while you weave and makes sure the flower holds its shape.
Tell Me How Your First Floral Design Turned Out
I hope this guide inspires you to grab a needle, find a scrap of fabric around the house, and give this beautiful, relaxing technique a try.
Watching a few passes of thread turn into a flower with real dimension is such a satisfying feeling.
I’d love to know what item or project you’re thinking of adding these roses to.
Going with classic tones, or feeling bold enough to try a two-tone combo?
If anything comes up during the process or you want to share a trick that works well for you, drop a comment below. I’d love to hear from you.
Grab your floss, enjoy every stitch, and give your everyday projects a personal, one-of-a-kind touch.

