
Give Your Linens a Handmade Charm. Learn how to work 5 kinds of hand-embroidered edging to decorate napkins, tablecloths, or handkerchiefs. Easy techniques, creative ideas, and tips for a perfect finish.
There’s something deeply special about a well-worked edge. Whether it’s a linen napkin, a delicate handkerchief, or one of those tablecloths that have been in the family forever, hand-embroidered edging adds a unique touch that turns a simple piece into something warm, carefully made, and full of soul.
Today I want to show you 5 kinds of edging stitch you can work yourself, even without much experience. Better still, I’ll tell you how to use each one depending on your project. That way your pieces won’t only look pretty, they’ll be well thought out too!
What is an embroidered edging?
An edging is a decorative finish stitched (or crocheted, in the case of yarn work) around the outline of a piece of fabric. Its purpose can be purely aesthetic, but it also reinforces the edge, keeps it from fraying, and visually frames the cloth.
You’ll see it a lot on napkins, tablecloths, handkerchiefs, towels, quilts, table runners, and home linens in general.
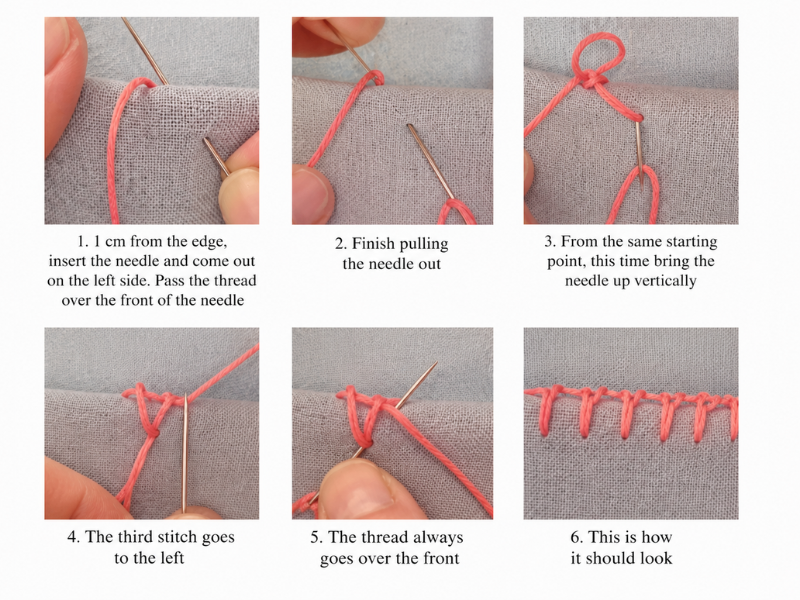
First edging stitch
I always start from the same point, about half an inch from the edge, and bring the needle through three times: first angling to the left, then straight down the middle, then to the right. The thread stays in front of the needle the whole time.
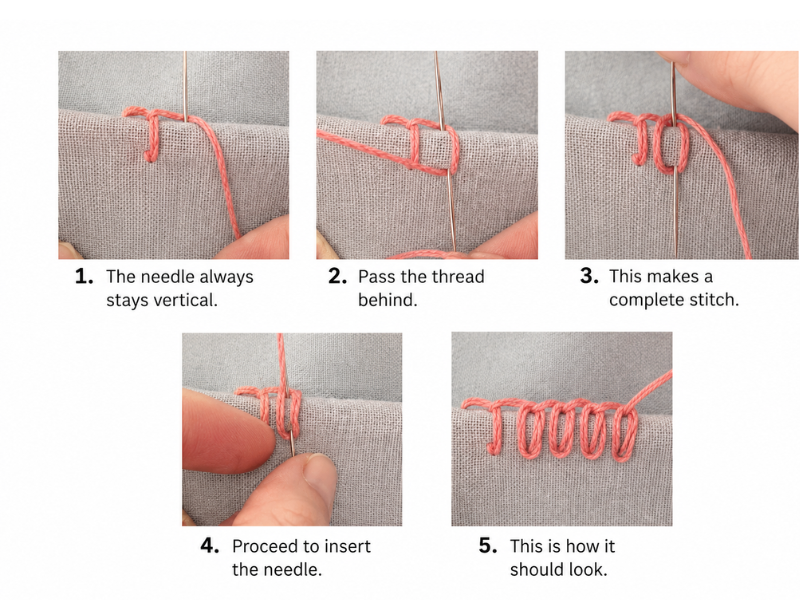
Second design
Here the needle goes in vertically, and before pulling it all the way out you wrap the thread around the back of the needle, one full turn, and then finish pulling the needle through.
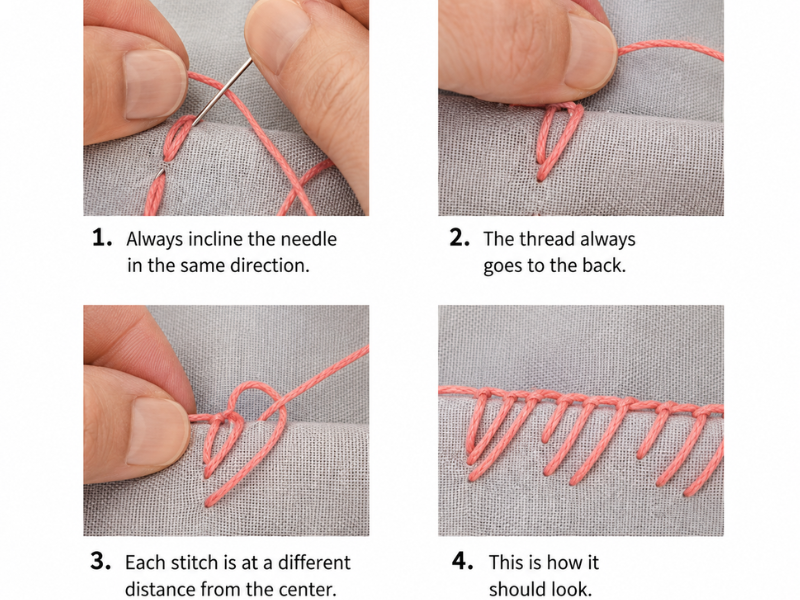
Third design
This one is very simple but looks lovely. All you do is bring the needle through at varying distances from the edge, always at the same angle, keeping the thread behind the needle.
Fourth design
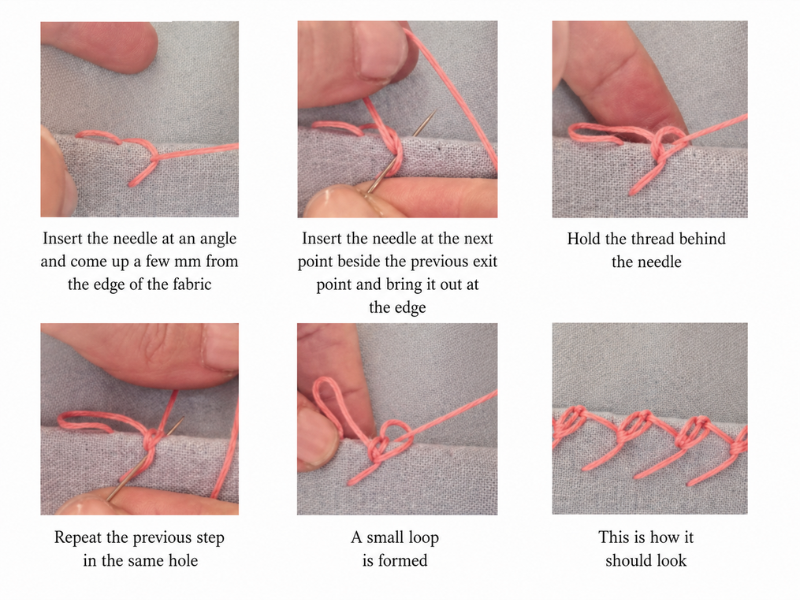
In this one the needle is angled again, but it doesn’t come out at the edge itself, it emerges a few millimeters short. On the next stitch, I go in right beside where the previous one came out and this time I do reach the edge, holding the thread behind the needle. I repeat that second step to form a small flower. That’s the pattern you repeat all the way around the fabric.
Ideal for the edges of small tablecloths, table runners, pillow covers, or tea napkins. It also looks beautiful at the corners.
Fifth edging stitch
This is the easiest of them all and it looks lovely. All you do is bring the needle through vertically every time, keeping the thread in front.
It works both as decoration and as a way to finish the edge so it doesn’t fray. Easy to learn and very versatile.
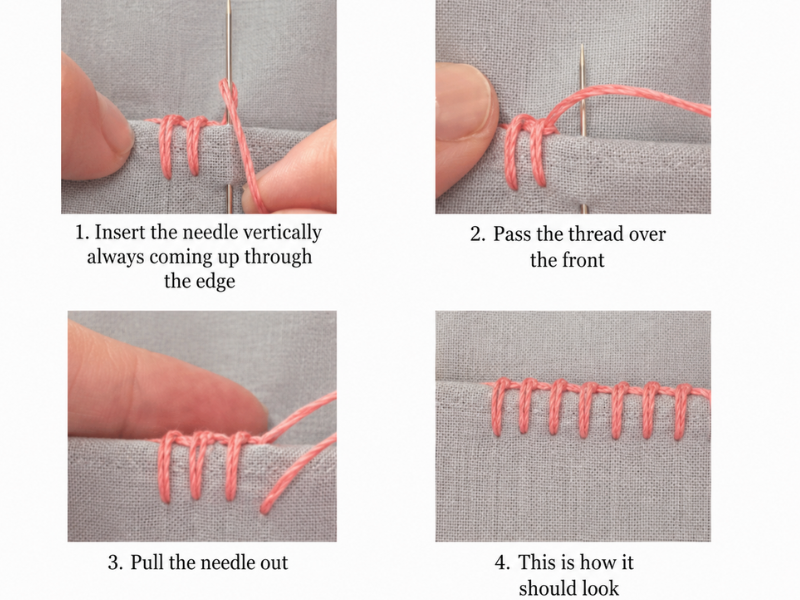
Perfect for handkerchiefs, napkins, or towels. Worked in a contrasting color, it doubles as a modern decorative touch.
If you’d rather, watch the tutorial on YouTube
Tips for perfect edges
- Mark a guideline with a pencil or ruler so your stitching runs straight.
- Work in good light, especially on white fabric.
- Practice each stitch first on a scrap of fabric.
- If you’re turning corners, make sure the design adapts (don’t cut the pattern off abruptly).
- Wash and press gently when you’re finished.
Why hand-stitched edges are worth the effort
I’ll tell you from experience: it isn’t only about how it looks. Hand stitching lets you put your own mark on something, give value to handmade work, and enjoy a slow, beautiful process. When you use a napkin you embroidered yourself, or give someone a handkerchief with their initial on it, the piece takes on a whole different meaning.
Which one do you want to try first?
If you liked these ideas, I’d love to know which one you’re going to try. Tell me in the comments.
If this article helped you and you’d like to say thanks, you can buy me a virtual coffee here.

