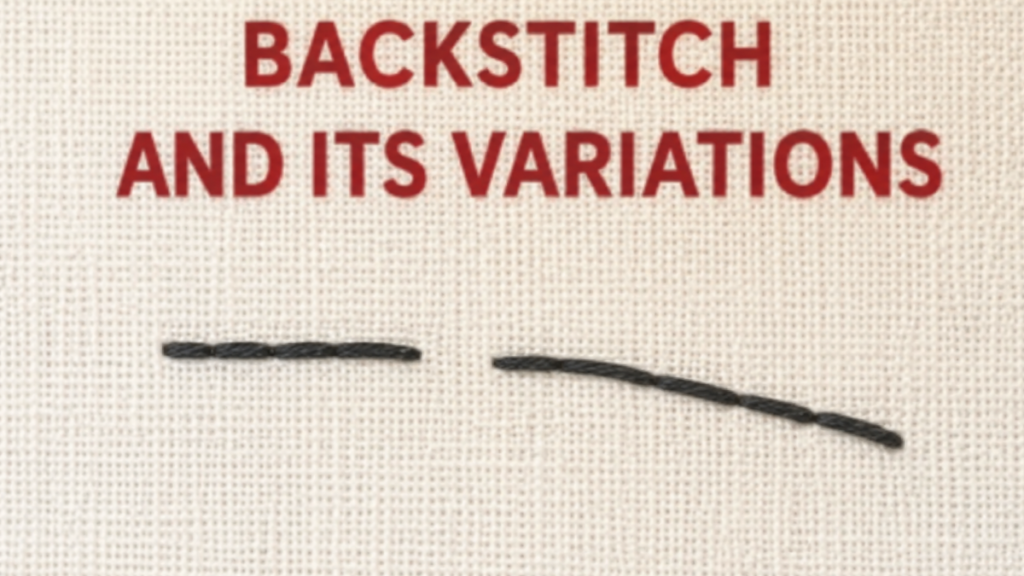
Backstitch, whipped backstitch, and interlaced backstitch step by step. A complete guide with techniques, uses, care tips, and tricks for stitching with confidence.
What Backstitch Is and Why You’ll Love It
Backstitch is one of the most classic and versatile stitches out there. It’s a straight, firm stitch that earns its keep in both embroidery and sewing. In embroidery, it’s what you reach for to outline shapes, define edges, and add crisp detail. In sewing, it’s the stitch that reinforces a seam and gives it real strength.
What I love about backstitch is that it looks simple, yet it can lift an entire design. Think of it as the pencil that outlines a drawing and makes it pop.
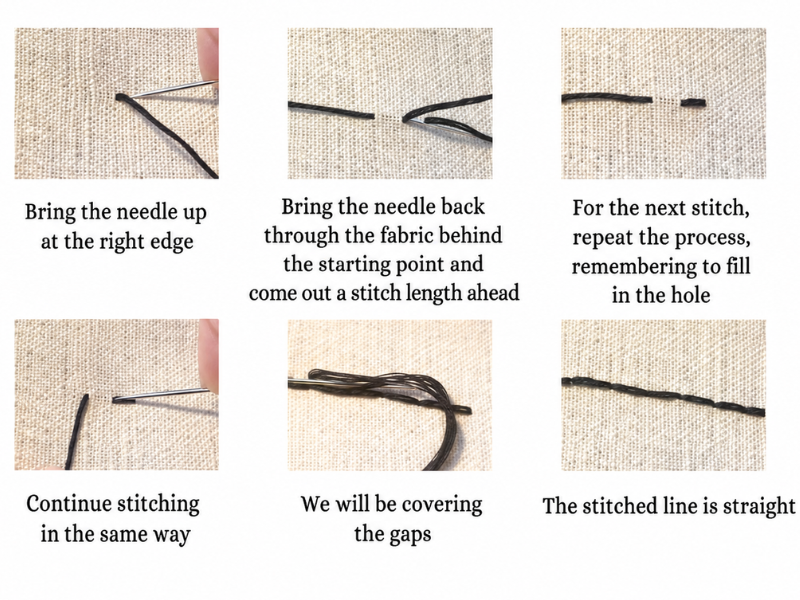
How to work backstitch step by step.
- Thread your needle with the floss you’ve chosen.
- Bring the needle up from the back of the fabric at your starting point.
- Move forward one stitch length (however long you want it) and take the needle back down through the fabric.
- Bring the needle up one stitch length ahead, then go back down at the end of the previous stitch, closing the gap.
- Repeat that motion, always stepping backward to join each stitch to the last.
One tip: work it in contrasting colors and your outlines will look far more alive.
Whipped Backstitch: Stitches That Wrap the Fabric.
Whipped backstitch stands out because the thread does more than travel in a straight line. It wraps around the edge of the fabric or the motif, almost like it’s hugging it. That makes it perfect for decorating and protecting an edge at the same time.
I like using it on fabrics that fray easily, since it’s practical as well as pretty. It also looks lovely on projects for kids, because it gives everything a softer, more handmade feel.
How to work whipped backstitch step by step.
- Mount the fabric in your hoop and pull it nice and taut.
- Work a row of backstitch the way I showed you above.
- Thread your needle and bring it up through the middle of the last stitch in the row.
- Pass the needle under each backstitch, always working in the same direction, from top to bottom.
- As you go, keep the wraps even so the finish stays uniform.
- Watch your tension: too loose and it looks messy, too tight and it puckers the fabric.
Interlaced Backstitch: Elegance in Motion.
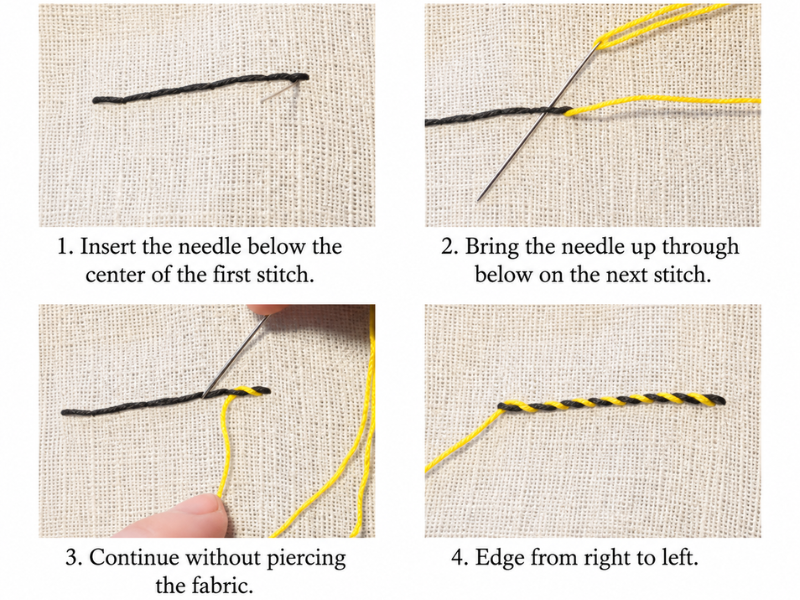
Interlaced backstitch, also called laced backstitch, is hands down one of the most fun to work. It takes a basic backstitch row and adds a second thread that laces through the stitches. The result is a decorative line with dimension and a sophisticated look.
It’s ideal for floral embroidery, borders, decorative lettering, or any project you want to dress up with a touch of whimsy.
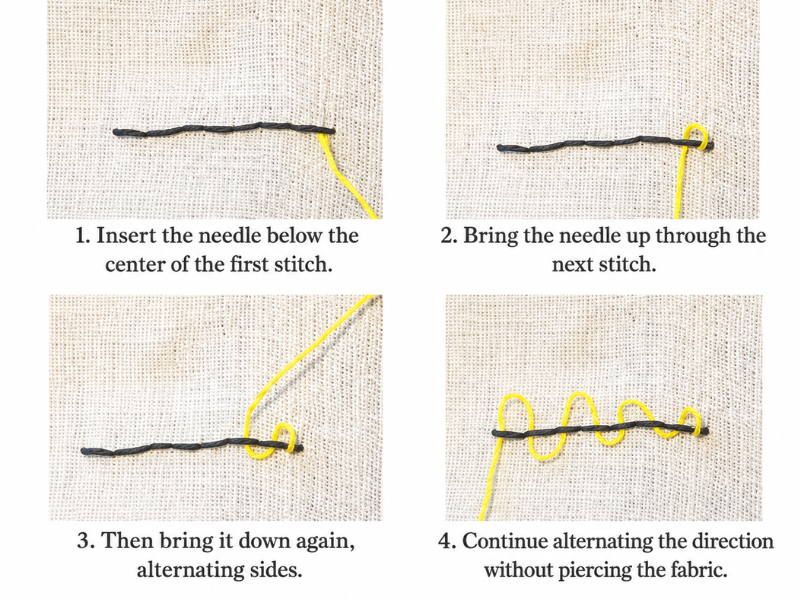
How to work interlaced backstitch step by step.
- Start with a row of regular backstitch.
- Thread your needle with a second thread, ideally in a different color for a pretty contrast.
- Lace that thread under and over the finished stitches, alternating as you go so it forms a series of arcs.
- Settle the thread gently into place without pulling it tight.
This stitch is like “combing” your embroidery: it brings a line to life that would otherwise sit completely flat.
How the Three Stitches Differ.
- Backstitch: basic, sturdy, perfect for outlines and defined edges.
- Whipped backstitch: covers edges, protecting and decorating at once.
- Interlaced backstitch: decorative, adds dimension and an extra pop of color.
You can also watch it on video
Tips for Perfect Backstitch.
- Always use a hoop to keep your tension steady.
- Experiment with different threads: stranded cotton floss gives a delicate line, while wool adds heft.
- Mark your design first with a pencil or a water-soluble pen. It’ll keep your lines from wandering.
- Start with short, even stitches before moving on to longer lines.
Creative Ideas for These Stitches.
- Backstitch: flower outlines, embroidered lettering, minimalist silhouettes.
- Whipped backstitch: edges of handkerchiefs and napkins, or the borders of fabric appliqué.
- Interlaced backstitch: decorative borders on pillows and doilies, accent details in framed hoops.
How to Care for Your Backstitched Embroidery.
- Always hand wash in cold water with a mild soap.
- Skip the washing machine and the spin cycle, which can distort your stitches.
- Dry flat on a towel.
- Store somewhere dry, protected from dust and direct light.
Frequently Asked Questions.
Can backstitch be used to sew clothing?
Yes, it’s actually one of the strongest stitches in hand sewing.
Does interlaced backstitch work for lettering?
Yes, and it looks beautiful because it adds dimension and a contrast of color.
Which thread is best for whipping?
Stranded cotton floss or perle cotton, since they cover the edges better and give a more even finish.
Can I combine all three in one project?
Absolutely, and it looks wonderfully original: backstitch for outlines, whipped backstitch for edges, and interlaced backstitch for detail.
Step by step guide to working backstitch
Total Time: 5 minutes
Thread the needle
Thread your needle.
Come up through the fabric
Bring the needle up from the back of the fabric to start.
Take one stitch forward
Move forward one stitch length and take the needle back down through the fabric.
Step back to close the gap
Bring the needle up one stitch length ahead and go back down at the end of the previous stitch, closing the gap.
Tools:
- needle
- hoop
Materials: thread fabric
I’ll admit it: interlaced backstitch was love at first sight. I remember trying it on a floral piece and being amazed at the life it gave the design. Basic backstitch, on the other hand, saved me on my earliest projects, because it’s simple yet incredibly useful. Whipped backstitch gave me the confidence that my embroidery wasn’t only pretty, it was protected too.
Getting comfortable with backstitch, whipped backstitch, and interlaced backstitch opens up an enormous range of possibilities. None of them are complicated, but all three are powerful, because together they let you shape, protect, and beautify your work. Best of all, they’re versatile enough to fit into almost any project.
If you’d like to explore the fundamentals, don’t miss the blog’s basic stitches section, including the running stitch, which I think will help you a lot.
So now I’m asking you, friend: which of these three do you want to try first? Are you drawn to the classic simplicity of backstitch, the practicality of whipping, or the decorative magic of lacing? Tell me in the comments. I’d love to hear from you and swap ideas. If you enjoyed this guide, please share it so more people can discover how lovely embroidery really is ^^