Want to master the stem stitch once and for all? Discover the secrets, tricks, and common mistakes in this epic embroidery guide. Come on in and transform your designs today!
Have you ever looked at a piece of embroidery and wondered how anyone gets those flowing lines that look almost like a delicate rope drawn onto the fabric? I asked myself that same question when I started out. It frustrated me a little that my lines looked “stair-stepped” instead of having the natural grace real flower stems have.
The stem stitch is probably the first stitch we all learn, yet it’s also the one hiding the most nuance. It’s versatile, elegant, and once you learn to listen to the thread and the needle, it becomes an almost meditative process. Has it ever happened to you that you start stitching and time just disappears? That’s exactly what I mean.
What exactly is the stem stitch, and why will you love it?
Before we get our hands into it, let’s talk about what makes the stem stitch so special. It’s an outline stitch, known in embroidery circles simply as stem stitch.
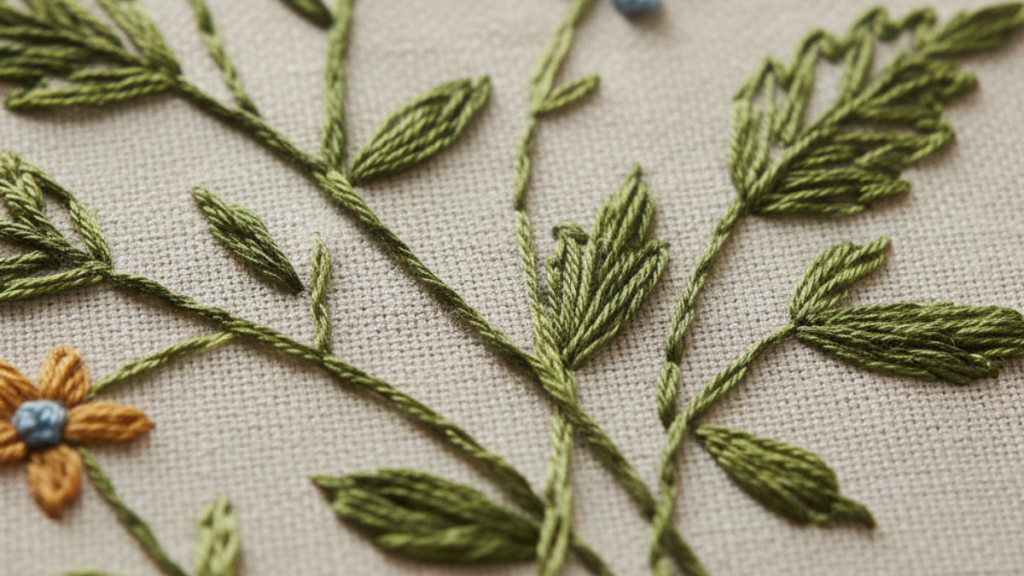
Its defining feature is that the stitches overlap slightly, creating a raised effect reminiscent of twisted rope. It’s ideal for:
- Drawing curved lines with real smoothness.
- Creating defined outlines that still have texture.
- Filling in shapes when you work the rows close together.
- Embroidered lettering (my favorite use!).
What I love most about this stitch is that it has personality. It isn’t a flat, boring line. It has volume and a clear direction. Best of all, once you understand the logic of which way to hold the thread, the rest is smooth sailing.
Materials: not every thread does the same job
If you’re anything like me, you have a box overflowing with floss in a thousand colors that you’ve collected over the years. Did you know the material you choose can completely change the look of your stem stitch, though?
Choosing your fabric
For practicing the stem stitch, I recommend starting with a fabric that isn’t too stretchy. A tightly woven linen or a lightweight cotton duck is perfect for this stitch. If the weave is too open, the stem stitch can sink into the fabric and lose that beautiful rope shape.
Threads: the soul of the project
This is where the magic happens.
- Six-strand cotton floss: the classic. I usually use 2 or 3 strands for a delicate finish, though you can go with all six if you want something bold!
- Pearl cotton: fantastic for the stem stitch because it comes pre-twisted. As you stitch, the twist of the thread adds to the twist of the stitch and the result looks super professional.
- Fine wool: if you’re after something more rustic with lots of dimension.
Needles and hoop
I’ll never get tired of saying it! The hoop is your best friend. For your stem stitch to come out even, the fabric has to be drum tight. As for the needle, use one with an eye large enough that the thread doesn’t get damaged passing through, but not so big that it leaves a huge hole in the fabric.
Setting the stage: design and transfer
Before the first stitch, we have to decide what we’re embroidering. Since we’re talking about the stem stitch, how about drawing a branch with a few winding curves? It’s the best way to practice.
You can use a heat-erasable pen (the ones we all reach for, such a brilliant invention!) or just a fine pencil. What matters is that the line is clear, because the secret to a good stem stitch is following your guide with precision.
Do you have your materials ready? Have you picked the thread color that makes you smile? Let’s get into the technique itself.
The fundamental step by step: the classic technique
Let’s get to it. Picture your drawn line in front of you.
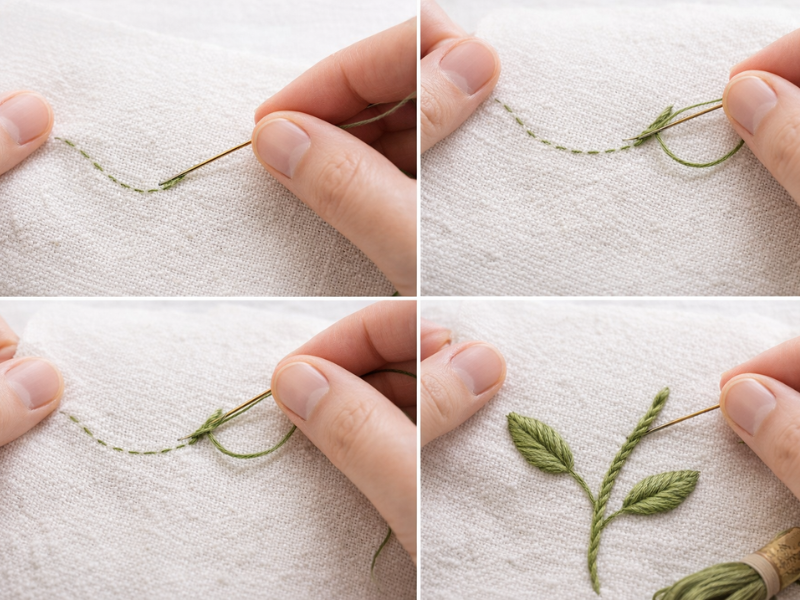
- Starting out: bring the needle up at the beginning of the line (point A). Pull the thread all the way through (or make a small knot if you prefer, though I’m a fan of burying the tail later on).
- The first stride: take the needle down a little further along the line, but here’s the trick, don’t pull the thread all the way through yet. Leave a small loop.
- The return: bring the needle up right at the midpoint of that stitch, making sure the loose thread always stays on one side of the needle. For the traditional stem stitch, right-handed stitchers usually keep the thread to the right of the needle.
- The sequence: now take the needle down further along and bring it back up through the hole where the previous stitch ended.
The best kept secret: thread position
This is the number one mistake I see in my workshops and the biggest source of frustration. For the stem stitch to look like a continuous, elegant rope, the working thread must always sit on the same side of the needle.
If you’re stitching a straight line and you decide the thread goes below the needle, keep it there to the end. Switch the thread upward halfway through and the “twist” of the rope breaks, leaving an odd seam in your design. It looks as if the rope suddenly came unwound.
Above or below? Left or right?
This is where the direction you’re stitching in comes into play.
- If you stitch left to right, the most common approach is keeping the thread below the line you’re following.
- If you’re left-handed and stitch right to left, the logic flips so your hand doesn’t block your view of the design.
Why does this matter so much? Because keeping the thread below (or to the right) gives the stem stitch a fuller look. Do it the other way around and you’re making something very similar called the outline stitch. They’re first cousins, but the visual result is slightly different. The outline stitch is flatter and finer.
Winding curves: how to master turns without losing your mind
This is where the stem stitch puffs out its chest and shows why it’s king. Unlike the backstitch, which can look a bit pixelated or pointy on curves, the stem stitch adapts beautifully. There’s one master trick, though.
The golden rule of stitch length
On a straight line, you can afford slightly longer stitches (about 3/16 of an inch). As soon as the curve gets tight, though, think of the loop of a letter or the edge of a petal, you have to shorten your stitches.
The tighter the curve, the shorter your stitches should be. Keeping them small lets the twist of the thread hug the drawn line, making the transition so smooth you can’t tell where one stitch ends and the next begins.
Which way does the thread go on a curve?
Write this one down, because it will change your life: for a perfect curve, the thread should always fall toward the outside of the curve.
- If you’re stitching a circle clockwise, keep the thread toward the outside of the circle.
- This makes the loop fill in the outer edge, so the line reads much more solid and defined. Place it toward the inside and the line tends to look thinner while the stitches separate a bit.
You can watch it on YouTube, and feel free to subscribe to the channel, it’s free!
Filling with stem stitch: texture you’ll fall for
Did you know it isn’t only for lines? The stem stitch makes an incredible filling option for giving your designs organic texture. I use it constantly for filling tree trunks or the petals of large flowers.
How to do it step by step
- Stitch the outline of the shape in stem stitch.
- Work a second row of stitches right beside the first, as close as you can get it.
- The expert trick: make sure the stitches in the second row are offset from the first. In other words, the center of a stitch in row 2 should line up with the join between stitches in row 1. Think of bricks in a wall.
- Always keep the thread on the same side across every row so the direction of the “rope” stays uniform.
The result is a surface with gorgeous dimension that catches the light in a way flat satin stitch never will. This technique takes patience, but the visual effect looks so professional it’s worth every minute.
Common mistakes (and how to fix them without throwing your hoop out the window)
Even after years of stitching, the stem stitch sometimes plays tricks on us. Here are the most common rescues:
- “My stitch looks like a line of separate dots”: You’re probably bringing the needle up too far from where the previous stitch ended. Remember that the needle should come up through the same hole where the last stitch finished, or right in the middle of the loop.
- “My thread keeps fraying”: The stem stitch creates a lot of friction on the thread since it passes through the same spots so many times. Try shorter lengths (no longer than the distance from your elbow to your fingertips), or use a bit of beeswax to protect the thread.
- “My fabric is puckering”: You’re pulling too tight. The stem stitch should rest on the fabric, not strangle it. Relax your hand and keep the tension just right.
Creative variations: bring out the artist in you!
Sometimes the basic stem stitch isn’t enough when we want to capture more complex textures. Here are my three favorite variations for when I’m feeling especially creative.
1. Alternating stem stitch
This one is a gem for decorative borders. Instead of keeping the thread on the same side of the needle throughout, you switch it with every stitch.
- Make one stitch with the thread to the right.
- Make the next with the thread to the left.
- Repeat the process. The result isn’t a twisted rope but a line that looks like a small braid or a very tight zigzag. It’s ideal for table linen borders or for giving wildflower stems a different feel.
2. Whipped stem stitch
Want your line to look like actual ship’s rope or a thick cord? This technique is magic.
- First, stitch a normal line in stem stitch.
- Then, with thread in the same color (or a contrasting one for a candy-cane effect), pass the needle under each stem stitch without piercing the fabric.
- The new thread wraps around the base, hiding the joins and creating a spectacular cylindrical dimension.
3. Gradients with stem stitch
Who said a stem has to be plain green? One technique I use a lot for depth is blending strands. If you’re working with six-strand floss, try combining 2 strands of a dark green with 1 strand of a lighter green. As you stitch, the natural twist of the stitch blends the colors organically, creating a play of light and shadow that looks painted with a brush.
After burning through a lot of thread over the years, I’ve learned that the invisible details make all the difference. Here are a few tips that don’t usually come with embroidery kits:
- Thread length: don’t get ambitious with how long you cut your thread. I know rethreading the needle constantly feels like a chore, but the stem stitch wears thread down through constant friction. Use a very long piece and by the end of it the thread will look ratty, dull, and fuzzy.
- Direction of light: if you’re filling a large area, think about where the light comes from in your design. The raised stem stitch casts tiny shadows. Stitch every row in the same direction and the texture stays uniform. Change direction on some rows and you’ll create a fascinating play of light.
- Finishing off: avoid knots when you can. Run the leftover thread under the stitches you’ve already worked. Since this stitch has plenty of body on the back too, the thread holds securely and the reverse of your work stays clean. A tidy back is any stitcher’s pride!
Frequently asked questions about the stem stitch
Are the stem stitch and the outline stitch the same thing?
Almost, but not quite. As I mentioned earlier, the difference is where the thread sits relative to the needle. In the stem stitch, the thread falls toward the outside of your stitching direction (usually below or to the right), which gives more volume. In the outline stitch, the thread falls toward the inside (above or to the left), producing a thinner line.
Can you work the stem stitch on stretchy fabric like a T-shirt?
Yes, but carefully. You’ll need a stabilizer on the back so the fabric doesn’t distort when you tighten the hoop. Without it, the stitching will pull in once you remove the hoop and the fabric will wrinkle badly.
What do I do if I run out of thread in the middle of a curve?
Don’t panic! Finish the stitch by taking the needle down as usual. Secure the tail on the back. With your new thread, bring the needle up at exactly the spot where it would have come up if you’d kept going (generally at the midpoint of the last stitch or at the end of the previous one). The transition will be invisible.
How many strands should I use?
It depends on the effect you want. For something very fine and botanical, 1 or 2 strands. For lettering that needs to read clearly from a distance, 3 or 4. For heavily textured fills, go for all 6!
Learn to master the stem stitch with this visual step by step guide. You’ll discover the secret to getting that signature corded texture, perfect for embroidering flower stems, lettering, and defined outlines. Whether you’re a beginner or looking to refine your technique for your 2026 decor projects, this tutorial full of expert tips will help you achieve flowing lines and flawless curves with every stitch.
Total Time: 15 minutes
Prep and marking
Tighten the fabric in the hoop until it sounds like a drum. Draw a straight or curved line with your marker to use as a guide. Cut a length of thread about 18 inches long to avoid tangles, then thread your needle.
The first anchor stitch
Bring the needle up at the start of the line (point A). Take the needle down about 3/16 of an inch further along (point B). Before pulling the thread all the way through, leave a small loop resting on the fabric.
Coming back to the midpoint
Bring the needle up right at the midpoint of the stitch you just made (point C). Make sure the needle always comes up on the same side of the thread (usually below or to the right of your guide line). Now pull the thread gently to close the loop.
Keeping the “rope” sequence going
Move another 3/16 of an inch along and take the needle down (point D). Bring the needle back up in the hole where the previous stitch ended. Keeping the working thread in the same position (above or below) is essential so you don’t break the twisted cord effect.
Adapting on curves
If your guide line curves, shorten your stitches to about 1/8 of an inch. Shorter stitches let the thread follow the turn better and keep odd angles or points from showing up in your design.
Invisible finish
When you reach the end of the line, take the needle down right at the end of the last stitch and bring it to the back of the fabric. Run the needle under the last 3 or 4 stitches on the back to secure the thread without bulky knots.
Tools:
- Embroidery hoop, Long-eye needle, Sewing scissors.
Materials: Linen or cotton duck fabric, Six-strand floss or pearl cotton, Water-soluble fabric marker.
Ready to give it a try?
Embroidery is so much more than pulling thread through fabric. It’s a moment for you, a way to slow the day down and make something with your own hands. The stem stitch is the perfect companion for that journey because it’s forgiving, easy to learn, and endlessly versatile.
I’d love to know what you thought of this guide. Is there a part you find harder than the rest? Do you have a trick you want to share with the community? Leave me a comment below! It genuinely makes my day to read about your experiences and see your designs come to life.
If you enjoyed it, don’t hesitate to share it with that friend who always says she wants to start embroidering but never quite dares. Now’s the perfect moment!