Learn how to work running stitch, whipped running stitch, and laced running stitch step by step. A complete guide with tricks, creative applications, and inspiring ideas for hand embroidery like a pro.
Embroidery is one of those timeless crafts that never goes out of style. Every stitch has something special about it: it quiets the mind, wakes up your creativity, and turns a piece of fabric into something one of a kind. Within this wonderful world there’s one stitch that’s fundamental and powerful: the running stitch.
Today I want to share a thorough, clear, simple guide so you can learn and master the basic running stitch, the laced running stitch, and the whipped running stitch. Three stitches that look simple but hide an impressive creative power.
If you’re a beginner, this article will open the doors of embroidery for you with confidence. And if you already have experience, I hope you’ll find new ideas to take your projects to another level.
The magic of the running stitch: why does it matter so much?
The running stitch is one of the first stitches we learn in sewing. Far from being just a filler, it’s a foundational technique that can become your best ally.
- It’s versatile: you can use it in sewing, decorative embroidery, and even quilting.
- It’s fast: you can cover large areas in a few minutes.
- It’s easy: ideal for practicing and building confidence with needle and thread.
- It’s creative: its variations (laced and whipped) deliver spectacular results with no complications.
The key? With something this simple you can create designs that catch the eye and give any project a professional touch.
The basic supplies you’ll need
Before you start, put together your creative kit. Nothing expensive or fancy, just simple tools:
- Cotton or linen fabric (in light colors if you’re just starting out).
- A wooden hoop, to keep the fabric taut.
- Embroidery needles with a rounded tip.
- Stranded cotton floss in several colors (pick at least two shades so you can practice the variations).
- Small precision scissors.
- A water-soluble marker or fabric pencil to guide your lines.
Tip: choose contrasting colors for practice, so you can see the difference between each stitch more clearly.
Basic running stitch: where everything begins
How to work it step by step
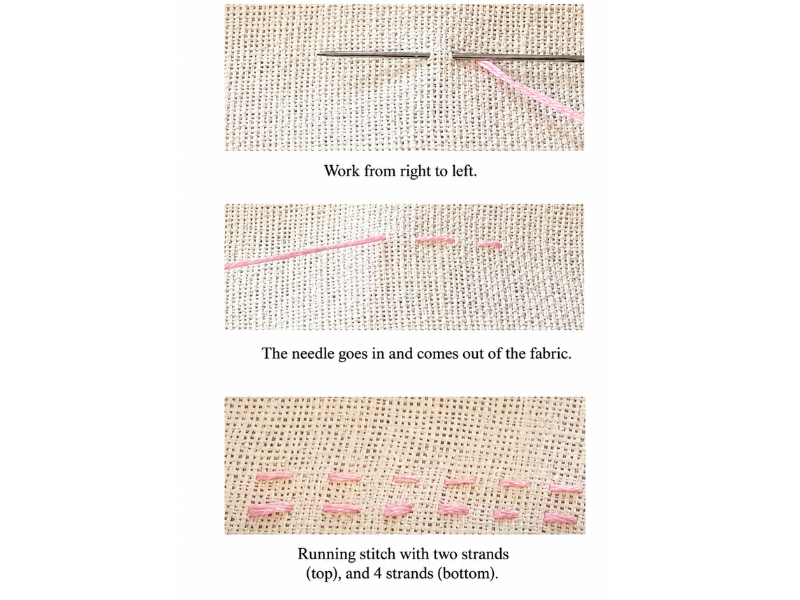
- If you need to, draw a straight line on your fabric after mounting it in the hoop.
- Bring the needle up from the back to the front. Always work from right to left.
- Take a short stitch forward.
- Leave a gap and repeat, aiming for stitches of an even length.
The result is a line of alternating stitches with small gaps, like a dashed road marking.
Tricks for a perfect finish
- Keep your stitch length and your gaps consistent so the line looks harmonious.
- Ease off on the tension so the fabric doesn’t pucker.
- Practice on straight lines before moving on to curves.
Creative uses
This stitch lets you:
- Outline simple drawings.
- Add decorative borders to tablecloths and napkins.
- Suggest seams in patchwork projects.
Laced running stitch: a unique decorative touch
The laced running stitch is like breathing life into the basic version. It’s a stitch that turns simplicity into a vibrant ornament full of texture.
Step by step
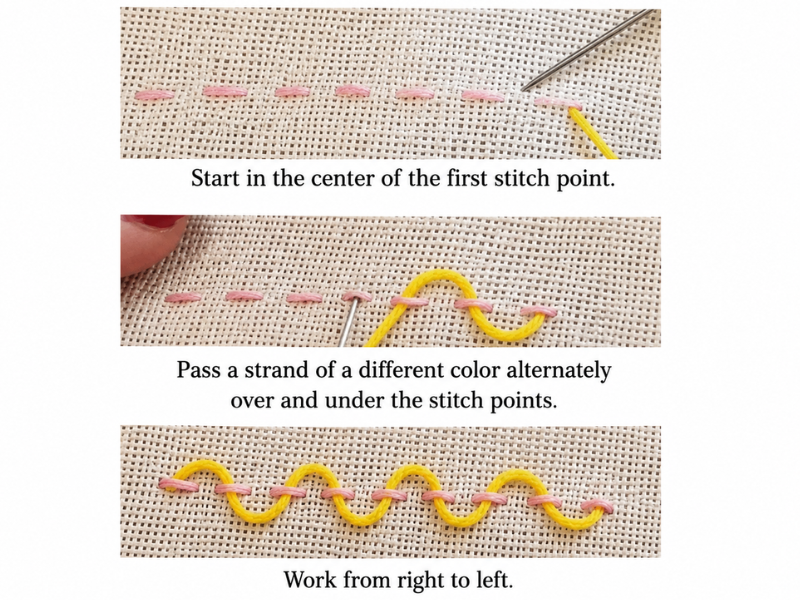
- Work a line of simple running stitch.
- With another color, pass the thread over and under each stitch alternately, without going through the fabric.
- Lace your way along in a zigzag until you reach the end.
Where to use it
- Marking borders on table runners.
- Decorating children’s clothing.
- Creating eye-catching edges on pillows.
Extra tip
Use threads of different weights. Fine wool laced over a cotton running stitch can create a beautiful rustic effect.
Whipped running stitch: elegance and contrast
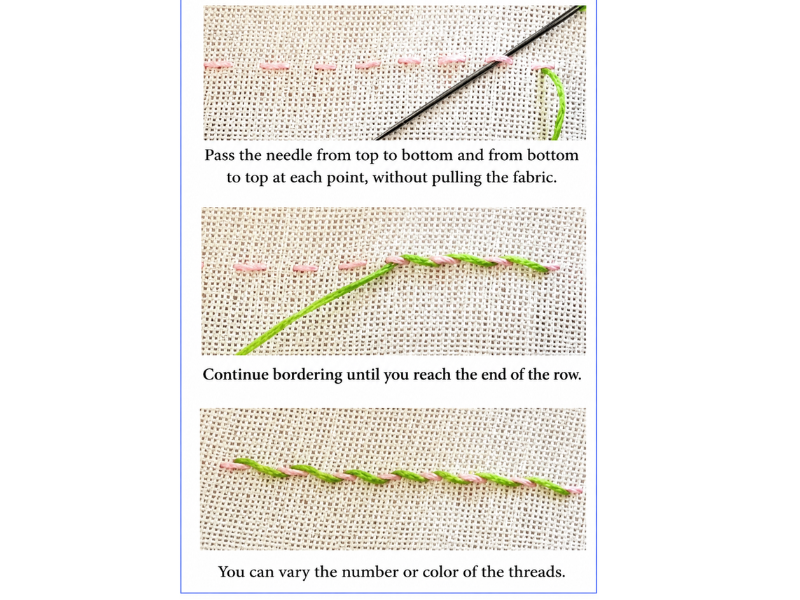
If you’re after a striking, eye-catching effect, the whipped running stitch is your best option. It means passing the needle from top to bottom over a basic running stitch, without going through the fabric.
Step by step
- Work a line of ordinary running stitch.
- With thread in another color, wrap over each stitch from top to bottom until you finish the row.
- Repeat until the line is complete.
Where to use it
- Decorating the edges of napkins, towels, or tablecloths.
- Adding eye-catching details to handmade clothing.
- Creating frames around floral embroidery.
Extra tip
Combine complementary colors (blue and orange, purple and yellow) for a bold contrast.
Power tips for better running stitches
- Work with short lengths of thread (12 to 16 inches) to avoid tangles.
- Use a hoop whenever you want a cleaner finish.
- Don’t obsess over perfection: small irregularities have their own charm.
- Experiment with curves and circles, not only straight lines.
The hidden benefits of practicing running stitch
Embroidery isn’t only a hobby, it’s a form of self-care. Every time you practice, your body and your mind benefit:
- It eases stress and calms anxiety.
- It improves your patience and concentration.
- It builds creativity and confidence in yourself.
- It connects you with a craft tradition passed down through generations.
Every stitch is more than thread on fabric: it’s a moment for you, a reminder that simple things can be powerful too.
Inspiring ideas for using these stitches
- Personalized handkerchiefs with laced running stitch in bright colors.
- Elegant table runners with whipped running stitch along the edges.
- Decorative framed pieces with simple running stitch forming words or phrases.
- Fabric pouches decorated with colorful running stitch, perfect for gifting.
- Handmade clothing with hand-stitched details that make all the difference.
Common mistakes and how to fix them
- Pulling the thread too tight: loosen up and let the fabric breathe.
- Uneven gaps: use a fabric marker to guide you.
- A messy back: practice finishing off with hidden stitches.
See all the details in the video
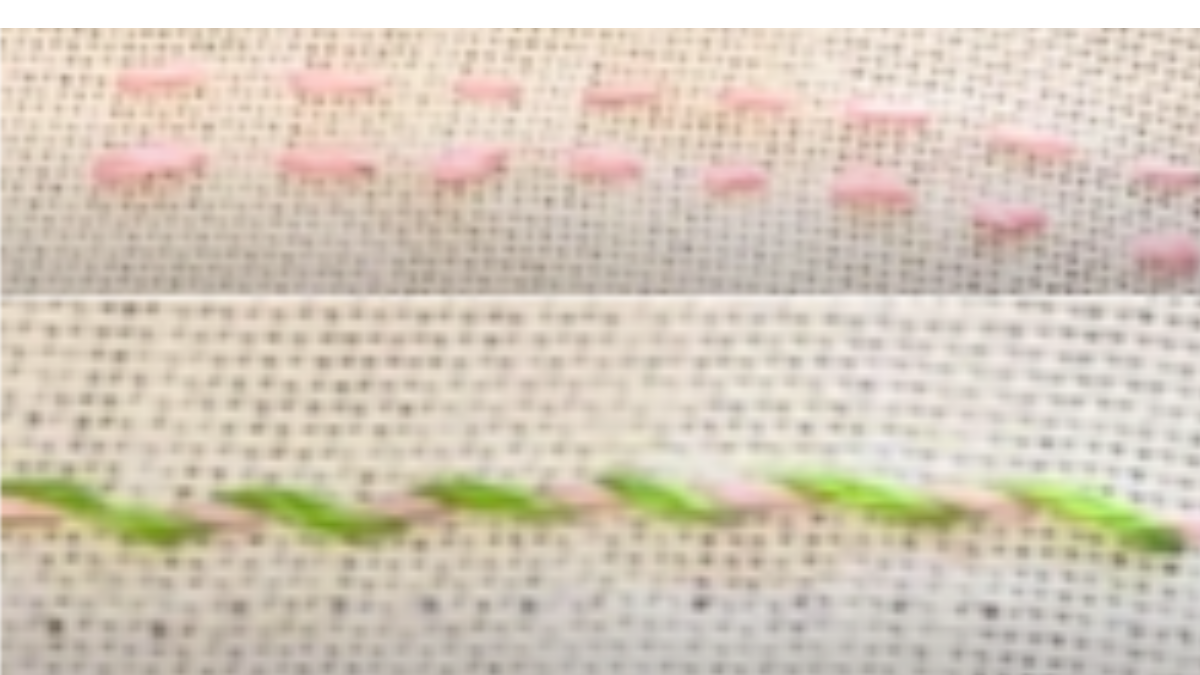
how to work running stitch step by step
Bring the needle up
Bring the needle up from the back to the front. Always work from right to left.
Take a short stitch
Take a short stitch forward.
Leave a gap and repeat
Leave a gap and repeat the process.
Materials: sewing needle linen fabric thread
Conclusion: small stitches, big results
The basic, laced, and whipped running stitches are much more than simple embroidery stitches. They’re the foundation of thousands of creative projects and an invitation to let your imagination run.
It doesn’t matter whether you’re a beginner or you’ve been stitching for years: these stitches will always have a place in your work. Best of all, they’re quick, versatile, and full of beauty.
Go ahead and practice them, play with color, combine techniques, and above all, enjoy the process. Because every stitch counts, every stitch matters, and every stitch is a small gift to yourself.
Now tell me, have you tried any of these running stitches yet? Do you prefer the simplicity of the basic one, the creativity of the laced version, or the visual punch of the whipped one? I’d love to read your experiences, questions, or tricks in the comments.
If this guide was useful, share it with other people who enjoy embroidery, so we can keep growing this creative community where every stitch counts.
Go on and try these edging stitches too, for decorating your linens!